Saturday, December 29, 2012

How I Do My Makeup: Modified Smokey Eye

Some people say I wear too much makeup. Guess who doesn't care. It makes me feel good, and that's what matters to me on a daily basis :)

First: I start with a clean naked face.
The "before" picture. No edits here. 
Next, I use a brush to apply liquid foundation in a thin layer over my entire face. Let me say it again: use a brush! This makes it possible to apply a thinner layer, thus looking more natural.  I only use concealer if there's something especially noticeable that needs to be fixed like a blemish. 

Next I use a bronzer to accentuate my cheekbones. I like to create the illusion of a shadow. I use a large brush to apply the bronzer just beneath my natural cheekbones to make them appear to sink in deeper. 

Basically any bronzer will work. Notice how it is beneath my actual cheekbone to create a sculpted look.
Then I apply a light, translucent powder over my entire face to keep the base from staying wet or shiny looking. I like a very matte look for my skin. Once again, it's more natural.

After I apply the powder I do two things that I went for years without doing, and I honestly don't know how!
 
First: my eyebrows. I have a wonderful eyebrow kit from Benefit that cost about $30. If you aren't ready to spend that much on your precious brows just yet, you can achieve a similar look using an eyebrow pencil in combination with some dark brown shadow. (pencil first, then shadow) But please, I beg you, do your eyebrows! Nothing looks worse than great makeup with ugly brows. 
My eyebrow kit. The left is wax which I use first with the angled brush.
Then I use the powder on the right.

This is how much much better my eyebrows look after filling them in. I can't stand the sight of them otherwise!
The next thing I use is eyeshadow base. It is also called "primer"  Once again, I don't know how I ever went without. Eyeshadow base keeps your shadow in one place without creasing, and makes it easier to blend. it is an absolute MUST in my book. 
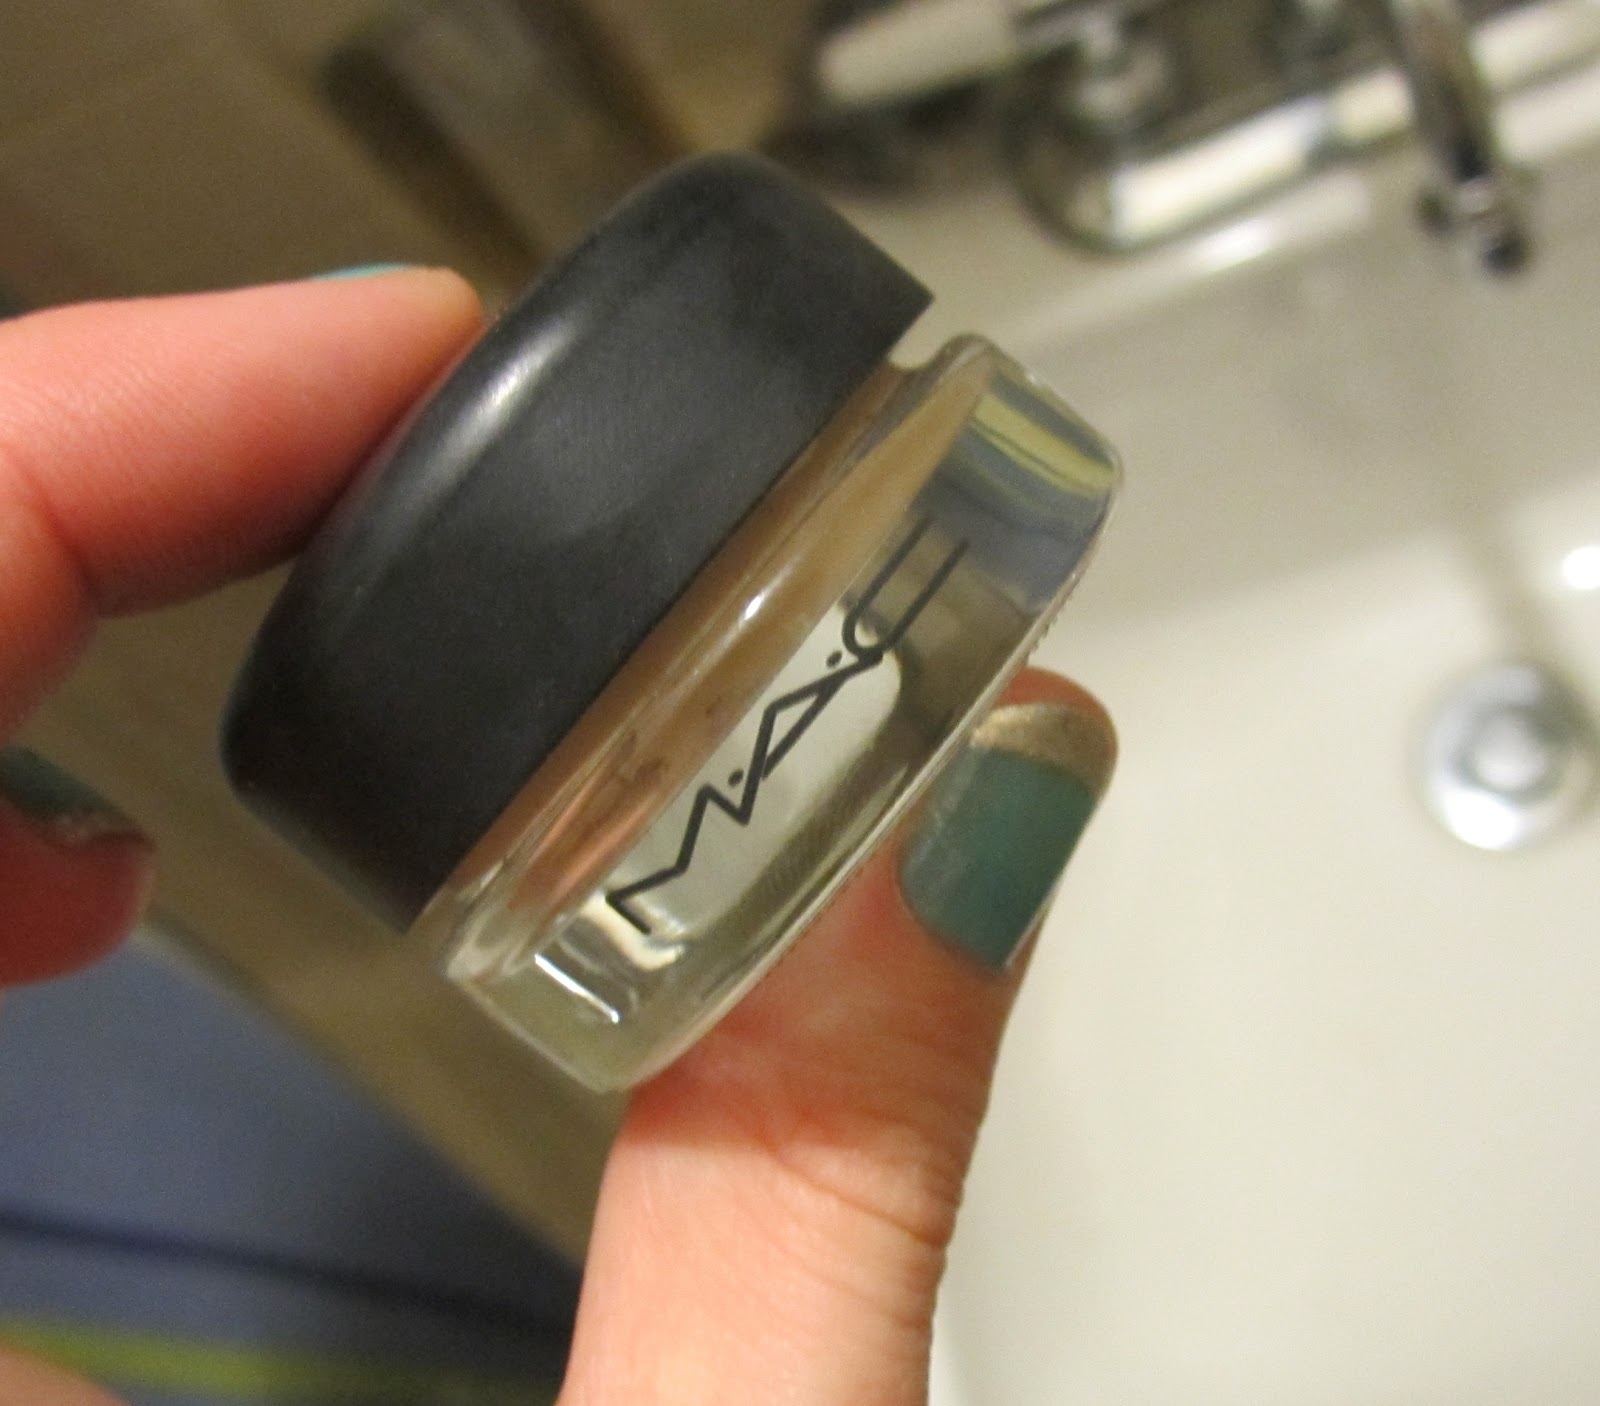
I use MAC's Paint Pot in Soft Ochre as a base. It's $18.50 but worth it.
I've had mine for more than 2 years now and I use it daily!
I apply the eyeshadow base with my finger from my lower lid all the way to my eyebrow. Then just below the arch of my eyebrow I add white shadow to highlight the brow bone. 


With white shadow to highlight.
I use Maybelline "Shimmer"
Just beneath the white shadow I use a matte nude color. I usually put it on the lower lid too, but it doesn't look much different than without. The purpose is to have powder to blend with other colors I use, and to keep a very matte look. The nude color I use is Maybelline "Champagne Fizz" and it says "Matte" on the package. 

After I adding the nude to the lower brow bone and the lowest part of my lid I add a more shiny champagne color to the inner corner of my eye and up towards the brow to about 1/4 of the way across my lid. I do this to accentuate the shape of my eye and to blend with the dark colors. Any lighter color will do, and I experiment with using color on this particular part of the eye a lot. For this look I used CoverGirl's #750 Mink. 

These are well loved. I use them every day! On the right is Covergirl #750 Mink
Now is the fun part! Get out your brushes :) You'll need one large crease brush and one large shadow brush. I use Sonia Kashuk brushes. They are a nice middle ground from the cheapest you can find (which are likely to irritate your eye with stiff bristles) and the most expensive you can get (which are, well, expensive) These brushes you can either get at Target, or here
This is the crease brush. Nice and fat. Comes to a handy dandy point.

This is the "large eyeshadow brush" I like that it's a little bit bulky,
 but also has a flat edge. 

Using the crease brush I apply black shadow starting at the outside corner and moving up and into the crease of the lid and lifting the brush as I get to the center. I repeat this several times. If you are trying to find the shape of your eye, practice with a medium brown and then go over it with black once you find the right spot. Note: it's higher than you think! 

After adding the black. 
I use Mac's black shadow because it lasts forever, but once again any black will work. It's best to start with a light touch because you can always add more. I like to make it extra dark near the corner of my eye. 

Tip: to keep from getting loose black shadow on the rest of your face use your free hand to hold a square of toilet paper or tissue underneath your eye. This will catch any loose shadow and save cleanup. If you do get loose black shadow on your face do not try to wipe it away with your fingers! Use a large brush to sweep it away gently. 

Next I use the large shadow brush to add more black just beneath my eye. It's ok to make it a little messy. 
This is why the flat edge of the large shadow brush is great!
Now all that's left is touching it up and adding lots of black mascara! If you like, you can add eyeliner, but I don't usually. This is mostly because the lid of my eye is pretty small. (which is also why I use a light color on the lid-so you can tell I have them)

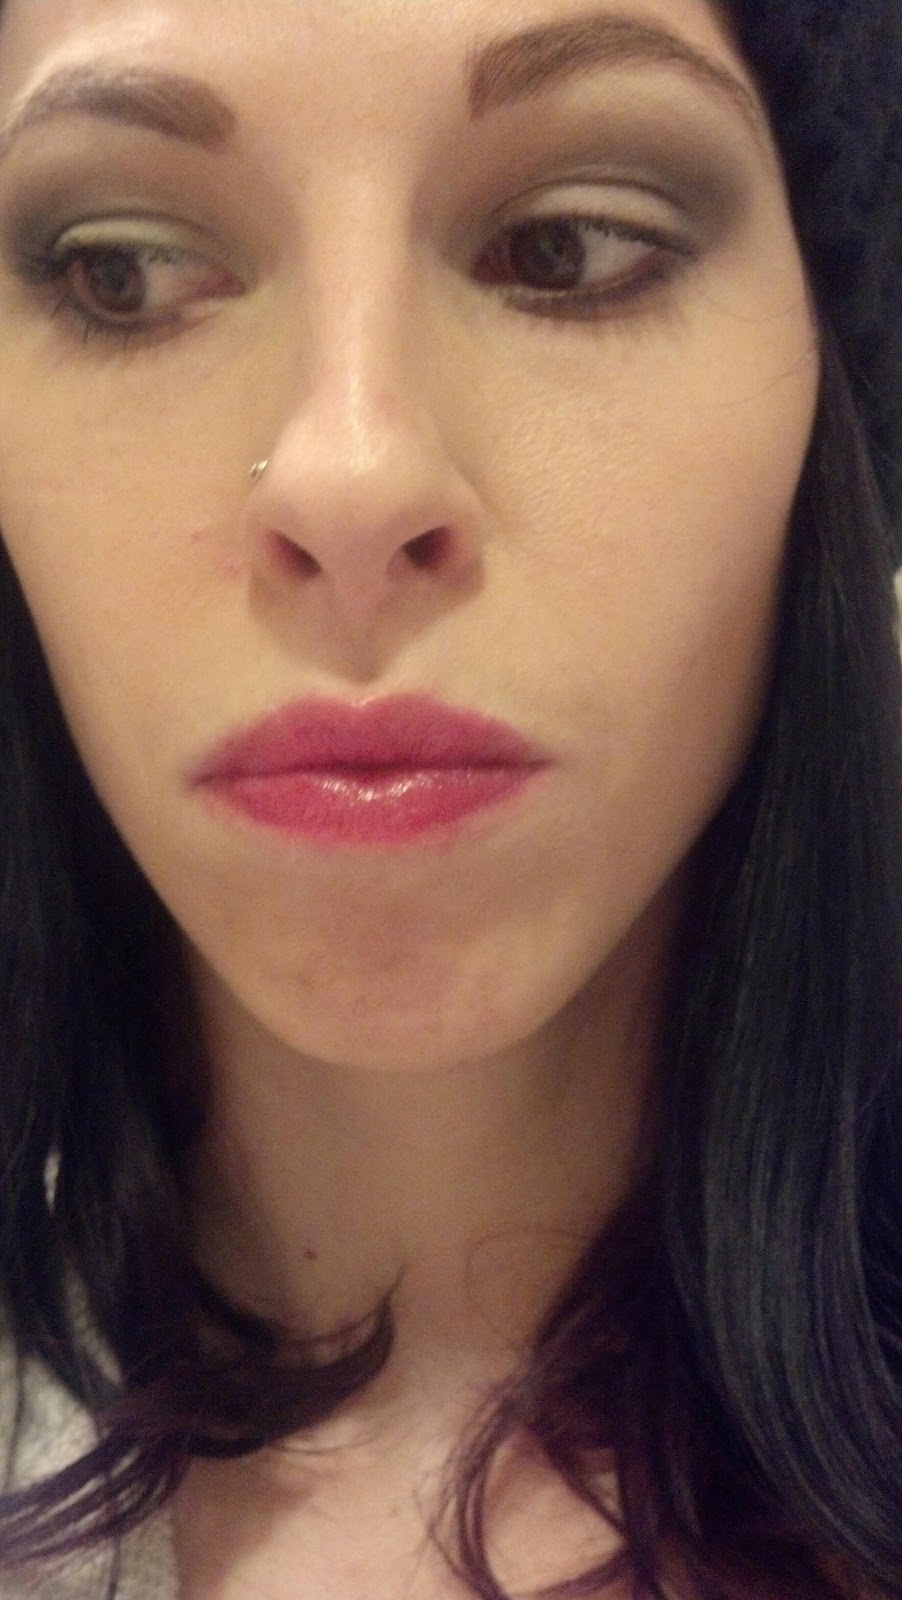
All done! This is basically my "go-to" makeup look. Takes me about 10 minutes from start to finish.

 If you do choose to add color, I like to do it as a highlight just under the crease or in the very corner of the eye. And don't worry if you make mistakes. It's ok for this makeup to look a little bit smudgey. It is a smokey eye after all.

So that's it! Next is getting dressed :)


Thursday, December 27, 2012

Don't Be Afraid of the Scissors. DIY Garter Leggings

Has anyone noticed the rebellion against jeans? Simple denim just isn't cutting it anymore. Leggings, thigh highs, shorts with tights, printed pants, anything but plain denim is acceptable. Well this may be a shocker, but I've never been a big fan of plain, so this trend is totally fine by me! The only problem is that the trendier the item, the harder it is to find at a reasonable price before it is obsolete. Well recently I found a pair of leggings that I loved on Nastygal, one of my favorite sites to cruise for styling inspiration. Not only were they marked at $58.00 which is out of my price range for a pair of leggings, but they sold out in 3 days. Even if I had decided to spend the money on them I wouldn't have been able to.
Pretty darn cute, right? 
So I decided to get my crafty bitch on. First stop: Ross Dress for Less. I got a pair of the leggings they always have for $5.99. This way if I mess up it isn't a huge loss. I probably should have gone to target and gotten a pair of the cotton/spandex ones they always have in the hosiery section, those would probably last longer, but maybe next time. The next thing I did was grab a sharp pair of scissors.
Step 1: Put on the leggings. Cut small notches to to mark the top and bottom of the openings on the outside and the inside. It is important to do this while you have the leggings on so you don't accidentally end up with a cheek slipping out the bottom! note: mark a slightly smaller area than what you may want. You can always cut more!

With notches cut.
Step 2: Lay the leggings flat on the ground. Cut small holes on either side of where the "garter" strip will be. Remember that this strip will be skinnier when it stretches out, so make your marks a little wide. You can always cut more! 
Now I know where to cut to!
Step 3: Starting at the top or bottom notch, cut a curve to the center mark, and then continue to the bottom mark. This should look like a half oval shape.

It's starting to take shape!
Step 4: Using the cut away area as a guide, cut the rest of the oval away until you have a circular shape missing from one side of your legging! Then repeat this on the inside of the leg, and the both sides of the other leg.
Remember to leave the strip a little wider than you want it.
Step 5: Voila! Put them on, you now have something very similar to those awesome garter leggings.

Ta da!

 If you want to take it a step further you can actually buy the suspender clips and cut the strips to attach them. Or you can use little hair accessories to clip on the front.

These are simple hair clips from
Forever 21. 

You're done! Now you can style them into an awesome outfit. Since they show a lot of skin I would wear them with something loose fitted on top. That way instead of just looking skanky, the outfit has a focal point.

This look is with my Steve Madden leather combat boots, my Obey cap, and my boyfriend's shirt tied into a dress.
For this look I wore a white dress with pearls on the peter pan collar, and added turquoise earrings for a splash of color.
Sweet and innocent on top, rough and tough on the bottom :) 

So the moral of the story is, don't be afraid of a pair of scissors. You can do a lot, save a lot, and have a lot of fun! 

Tuesday, December 18, 2012

Another Way to Wear a Scarf

Inspirations: Menswear, Michael Kors
I was tempted to make this post about spring (probably because I saw snow in Seattle for the first time this year, which makes me long for florals and brights) but the world had something else in store for me today. I work at a high end shopping center with stores such as Louis Vuitton, Jimmy Choo, Tory Burch and Neiman Marcus. This means that most of the people who pass by my store are extremely wealthy, and some are also fashionable.
My inspiration came today when an older gentleman strolled by wearing a long charcoal grey wool coat, a black hat, and a lighter grey scarf. The way he wore his scarf was very clever. He had it wrapped behind his neck but instead of tucking it into his coat or letting it hang freely, the scarf was neatly tucked into the belt he was wearing around the outside of his coat. I really enjoyed his ensemble, especially because I like the look of a belted coat. It defines the waist, and can make even a loose coat look fitted.
Soon after my stylish gentleman sighting, I was looking at runway shows on style.com as I often do, when I came across these looks in the Michael Kors pre-fall 2013 collection (you can see more here):
Look 1: it is not a coat, but very similar idea.

Look 2: with a big warm scarf do we really need a coat? 


And since I'm such a fan of the belted look on a coat, it should come as no surprise that all my coats already have a belt. Here's a quick idea of how I would interpret the scarf-in-the-belt look:


Twisted and to the side with a bow

Wrapped and tucked.

Outside the coat completely:
inspired directly by the Michael Kors looks.
Let me just add that I bought this coat at Ross for $25.00 and the scarf from Nordstrom Rack for $15.00. This look is great because there are so many variables. I chose to add a splash of color to a black coat, but you can just as easily mix prints this way, add a thick belt or a thin one, or add texture with a large knit scarf. So many options! Have fun <3

Friday, December 14, 2012

What I Love Today: Sheer Lipstick

Recently I have discovered a product that I feel the need to tell everyone about: L'oreal Paris' Colour Riche Caresse lipstick. You have probably seen the advertisements. I know I did, that's why I decided to buy it in the first place. I was hoping it would be exactly like the ad, and I know it sounds crazy but I would say it actually is! Even though it is technically a lipstick, the color is so sheer, it is more like a tinted gloss. A tinted gloss that somehow isn't sticky, doesn't get clumps of color, and isn't too shiny. It looks very close to natural. It is exactly what I've been looking for. Here are some of the reasons why:
* I have a large mouth. Big lips. This makes it difficult to wear lipstick (especially in bright colors-which I love) without looking ridiculous.
* Lipstick is a very strong statement look. It can be a bit daunting! Think about it... how many people do you know that wear lipstick on a daily basis?  Heavy lipstick has a time and place.
* I like to wear color on my lips to even them out, and hide imperfections.
* A little color on the lips draws attention to them.
*I typically wear a lot of eye makeup. It is hard to wear a heavy eye with a colored lip without looking like a streetwalker or a drag queen. Not that there is anything wrong with hooker chic or being a queen, but once again, it has a time and a place ;)

So far I have bought two colors: #176 Sunset Angora, which is a subtle pink color and #179 Cherry Tulle which is a dark/bright red. I hope these pictures give you a good idea of why I love it!
These are my naked lips 

On the left is Covergirl's 400 "Temptress" compared to the Sunset Angora.
Pretty similar shades of pink. 
This is the difference between the pinks.
You can see how sheer the L'Oreal is by comparison. 
Wearing the Sunset Angora. 

A similar shade of red. The black tube is Wet N' Wild #911D Stoplight Red.
The other is the Cherry Tulle from L'Oreal 

Comparison between the red shades. Once again, so sheer!  
Wearing the Cherry Tulle. 

Wednesday, December 12, 2012

An Introduction


There I am: standing in the store staring at those shoes, trying to decide if I have to have them or if I need to eat again before payday. To some, this sounds insane. To me, this sounds like an easy decision.
Let’s just say the hunger for fashion outweighs the hunger for anything but Top Ramen. I’m a girl who has a deeply rooted love for all things fashionable. But I’m also a real girl. I don’t have money to go shopping every week, and I generally can’t afford designer things. I happen to believe that fashion isn't about being superficial, or even having the newest, latest, or trendiest items. It is art. It’s about expression. Even people who claim to reject fashion express themselves by what they wear. That girl wearing the plainest clothes she can find is expressing her rejection of fashion just as much as the girl in the floral-print leggings, platforms, and leather jacket is expressing her claim to understand it.  
Fashion plays a part in every day of my life. I could be drooling over images in a magazine, or finding a new way to wear an old shirt, but it’s always in my head. In this blog there will be no pretense of having better things than the next girl, or being able to afford more than any other 25-year-old recent college grad. This blog is about making it work with what I have. Don’t get me wrong, I love designers, fashion magazines, and shopping even when I can’t buy anything, but that’s because I’m not looking for the things I find. I’m looking for inspiration. A new look to create, a new way to wear something, or a new combination of textures, colors, or silhouettes. Almost every look I create is inspired by something, and has more thought in it than anyone might have guessed. It is my inspired expression.  Artists have many mediums through which to express themselves, mine is clothing and accessories. 
I can’t promise you will love every post, or that my fashion blog will be different than every other, but I can promise that I have a burning desire to share tips, trends, ideas, and everything else fashion with you, and to keep it real. And since no blog is fun without images, here are a few of my favorite editorials I've collected in the last several years.  I love each one for a different reason.


 So let’s say that was my introduction. From now on, this is my fashion story.